Colourful Norwich skyline illustration

Michael Sage

IT, Digital & Culture

Ubuntu 24 LTS – Unifi Mongo Update to 7.0

Ubuntu 24 LTS - Unifi Mongo Upgrades

For the longest time unifi has only supported mongodb 3.6 or older (or mongodb 4.4 for some newer versions (7.5-8.0)), with the release of 8.1.x this has now been updated to version 7.0, still old, but supported, good times.

However, the install on 7 is less that easy, and if you’re on an older server (or just upgraded to 24.04 LTS), then there are a number of steps… Hold on tight here we go…

First step, backup unifi, snapshot the server, make a brew, pray to the IT gods…

Next, we need to go from 3.6 to 4.4, luckily the ever great GlennR has a script for this. Go ahead and run his unifi upgrade script selecting the mongodb upgrade option. For some reason I couldn’t  get the script to go any further than 4.4…

The script can be found here:

https://get.glennr.nl/unifi/update/unifi-update.sh 

Next things get a bit wild, so I’ve adapted someone elses script (https://techblog.nexxwave.eu/update-mongodb-4-4-to-7-0-on-unifi-servers/). I’d save the below into a file and make it executable and run it.

** Proxmox Users: You may need to update or change your CPU type the default KVM64 doesn’t expose the AVX flag, so you can either update your cpu.conf file (below) or change the CPU type to host, your CPU must support AVX

/etc/pve/virtual-guest/cpu-models.conf.

cpu-model: avx
    flags +avx;+avx2;+xsave
    phys-bits host
    hidden 0
    hv-vendor-id proxmox
    reported-model kvm64

Upgrade Script:

#!/bin/bash

# Upgrade MongoDB from 4.4 to 6.0
# Author: Nexxwave https://www.nexxwave.be
# MongoDB releases archive: https://www.mongodb.com/download-center/community/releases/archive
# MongoDB versions: https://www.mongodb.com/docs/manual/release-notes/
# Adapted for Ubuntu 22/24 by Michael Sage 28/8/2024

###
# Stop UniFi
###

echo "## Stopping UniFi"
systemctl stop unifi

###
# Download MongoDB Shell
# 'mongo' is deprecated since Mongo 6.0, so we need a separate pacakge.
###

echo "## Download MongoDB Shell"
wget https://downloads.mongodb.com/compass/mongosh-2.2.5-linux-x64.tgz -P /tmp/
tar xvzf /tmp/mongosh-2.2.5-linux-x64.tgz -C /tmp/

###
# Upgrade to MongoDB 5.0.26
###

echo "## Downloading and extracting MongoDB 5.0.26"
wget https://fastdl.mongodb.org/linux/mongodb-linux-x86_64-ubuntu2004-5.0.26.tgz -P /tmp/
tar xvzf /tmp/mongodb-linux-x86_64-ubuntu2004-5.0.26.tgz -C /tmp/

echo "## Starting MongoDB 5.0.26 in background"
sudo -u unifi /tmp/mongodb-linux-x86_64-ubuntu2004-5.0.26/bin/./mongod --port 27117 --dbpath /var/lib/unifi/db &
sleep 60

echo "## Executing feature compatibility version 5.0"
/tmp/mongosh-2.2.5-linux-x64/bin/./mongosh --port 27117 --eval 'db.adminCommand( { setFeatureCompatibilityVersion: "5.0" } ) '

echo "## Shutting down MongoDB 5.0.26"
/tmp/mongosh-2.2.5-linux-x64/bin/./mongosh --port 27117 --eval 'db.getSiblingDB("admin").shutdownServer({ "timeoutSecs": 60 })'
sleep 10

###
# Upgrade to MongoDB 6.0.15
###

echo "## Downloading and extracting MongoDB 6.0.15"
wget https://fastdl.mongodb.org/linux/mongodb-linux-x86_64-ubuntu2004-6.0.15.tgz -P /tmp/
tar xvzf /tmp/mongodb-linux-x86_64-ubuntu2004-6.0.15.tgz -C /tmp/

echo "## Starting MongoDB 6.0.15 in background"
sudo -u unifi /tmp/mongodb-linux-x86_64-ubuntu2004-6.0.15/bin/./mongod --port 27117 --dbpath /var/lib/unifi/db &
sleep 60

echo "## Executing feature compatibility version 6.0"
/tmp/mongosh-2.2.5-linux-x64/bin/./mongosh --port 27117 --eval 'db.adminCommand( { setFeatureCompatibilityVersion: "6.0" } )'

echo "## Shutting down MongoDB 6.0.15"
/tmp/mongosh-2.2.5-linux-x64/bin/./mongosh --port 27117 --eval 'db.getSiblingDB("admin").shutdownServer({ "timeoutSecs": 60 })'
sleep 10

echo "## All done"

Then we move on to upgrading to version 7, nearly there!

curl -fsSL https://pgp.mongodb.com/server-7.0.asc | sudo gpg -o /usr/share/keyrings/mongodb-server-7.0.gpg --dearmor
echo "deb [ arch=amd64,arm64 signed-by=/usr/share/keyrings/mongodb-server-7.0.gpg ] https://repo.mongodb.org/apt/ubuntu jammy/mongodb-org/7.0 multiverse" | sudo tee -a /etc/apt/sources.list.d/mongodb-org-7.0.list
apt update
sudo apt install mongodb-org mongodb-org-mongos mongodb-org-server mongodb-org-shell mongodb-org-tools mongodb-org-database-tools-extra

Now you can start unifi again

sudo systemctl start unifi

Finally finish the update with:

mongosh --port 27117 --eval 'db.adminCommand( { setFeatureCompatibilityVersion: "7.0", confirm: true } )'

Check if everything went ok

mongosh --port 27117 --eval 'db.adminCommand( { getParameter: 1, featureCompatibilityVersion: 1 } )'

The output should look something like this:

{ featureCompatibilityVersion: { version: '7.0' }, ok: 1 }

Go Bag…

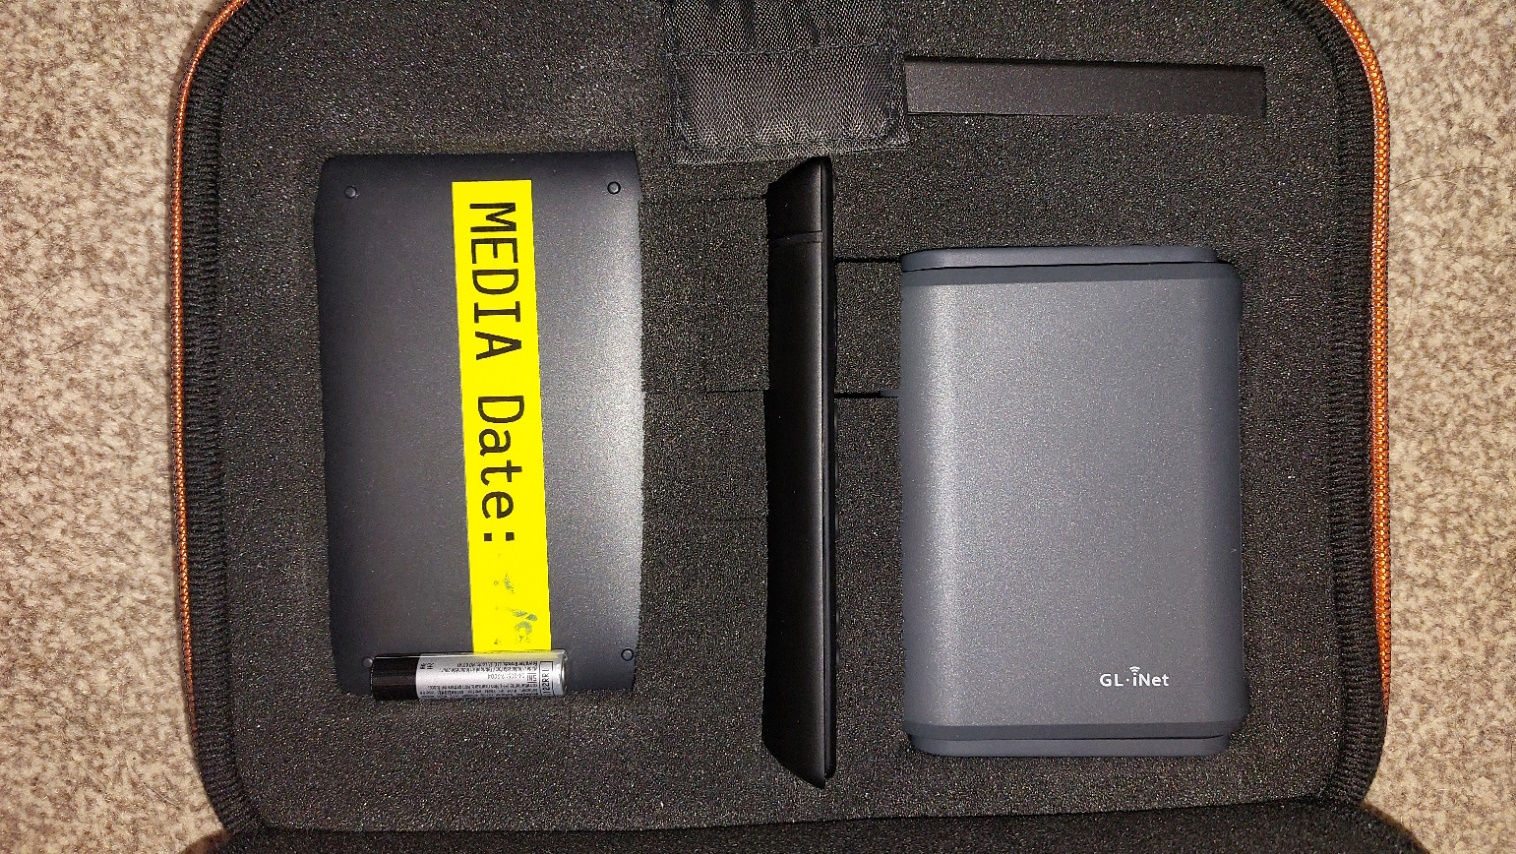
GL.inet Slate Plus, USB hard drive and firestick in case
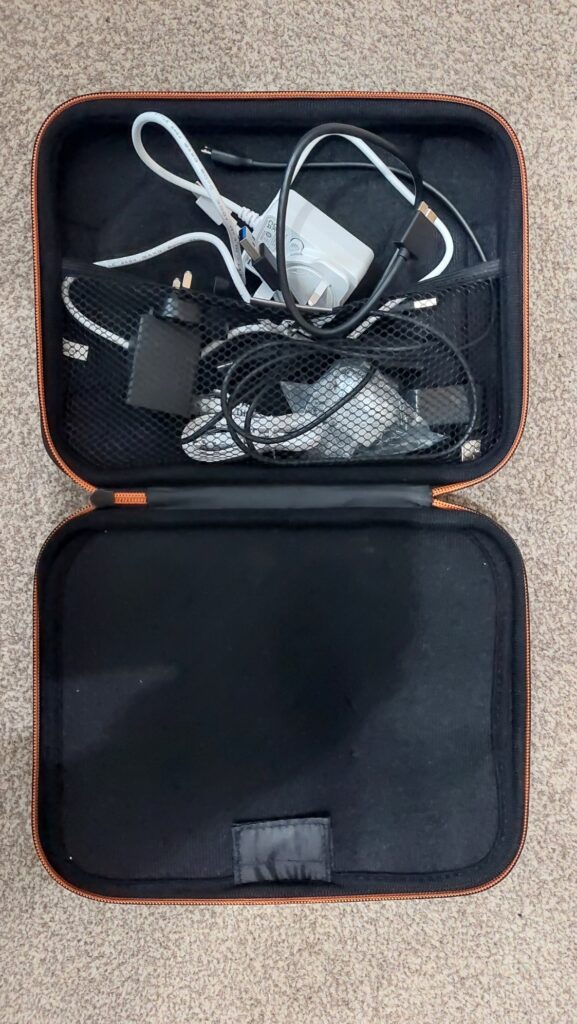
Cables in case

Recently we were staying in a hotel for a couple of nights away, the weather turned rubbish so we went to bed early and read (rock and roll) which was great, but it got me thinking, would there be a way to take our movie library with us if we went away for a long time or if one of us was travelling for work and just wanted to crash. I want this solution to work with or without internet access, for two main reasons firstly internet can be very expensive in hotels or on a cruise and secondly there might not be any internet at all!

I started with the router, I have a GL Inet Slate Plus that I use for the mobile lab project, so seemed like a good place to start. I added the DLNA & CIFS plugins to the router and attached a 2Tb USB hard drive (the local media part).

Next came the client device, I am a long-term fan of the Roku media players, however, no matter how much I tried I couldn’t get this to work reliably with DLNA. I had a firestick lite kicking about, so I have decided to use this. I set it up to connect to the wifi on the Slate Plus so far so good!

The Slate Plus has several WAN options, cabled, wifi repeater, USB tethering so multiple ways to get the new mini network online. While testing at home I used USB tethering to an android phone which gave good performance.

The firestick works great while it has an internet connection, I recently went away with work and thought it would be the ideal time to test it all works in the wild! I connected everything together powered it on and it worked… Kinda… The firestick can’t load a home screen without an internet connection so you have to launch the app directly, this worked fine and the firestick connected to the hotel TV without issue.


Next I connected the Slate Plus to the hotel wifi, again this worked well and any device connected to the slate then had internet, so it works for connection sharing too, a really useful feature if the internet is expensive.

Closed case

The great van upgrade.

Having run the van from 2x Pi 4 (2Gb) for two years, I decided it was time for a refresh. I wanted to bring the whole setup to something a bit more stable and modern (not that I’d had any major issues) I also wanted to refresh for future internet upgrades, be it 5G or Satellite (come on Amazon). I have recently started playing with beelink mini PCs and following the lab in a bag (It’s a lab in a box – Michael Sage) experiment I decided to take the plunge. The main thing that had stopped me doing this was the lack of dual NIC affordable mini PCs… Enter the Beelink EQ12 (16Gb RAM / 500Gb) and an additional 2Tb SSD (for media).

This setup allowed me to move the VPN from the router (the Cirrus AP1300-LTE) to an OPNSense VM. This means the only thing I am using the Cirrus for now is the internet connection (we’ve come a long way since the initial install where the Cirrus was used for internet, wifi, VPN, etc).

I also decided to add the flic hub mini to the van, as home assistant running the flics has never been great and it’s a nightmare to add any more flics!

Flic hub mini and flic 2 buttons

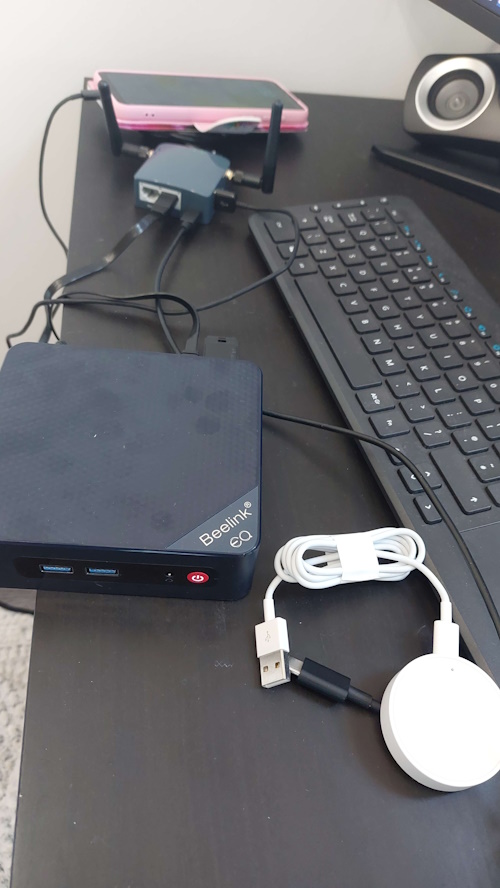
I set it all up at home using the GL.iNet Shadow with a tethered phone, which I have for testing and hotel use.

Home testing (flic hub mini, beelink mini PC, Gl shadow and mobile phone)

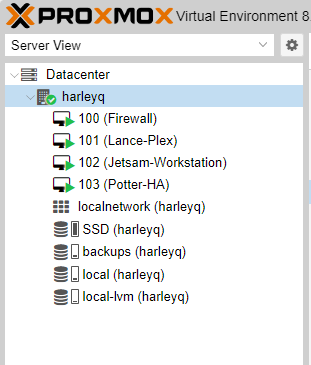
I decided I would re-IP the van to 192.168.9.x while I was doing the move to ensure that I could fully test (this will become important later). Once I’d setup proxmox on the mini PC I created 4 virtual machines (firewall, plex server, workstation and home assistant). I then setup the site to site OpenVPN, I know there are better VPN’s available now, but it’s something I’m familiar with and it’s stable.

Harley Q Proxmox Server

With all the VMs configured and the data copied, the link to the van decided to stop working, so it seemed like a good time to do the upgrade. I took a spare switch and 4G router just in case something had actually died!

I then worked through my checklist, configuring NUT, re-IPing the switch, router, camera, roku, smart home, added the flics to the hub, recreating node red flows.

I hit an issue, every 5 minutes the wireless would go down, it looked like the AP was rebooting, ugh, the only spare I didn’t bring was an AP. I had a look around and couldn’t find anything, so ordered one of amazon to replace it. For 4 or 5 hours I struggled to complete my checklist with the wifi going down for about 30 seconds, every 5 minutes… every 5 minutes… there was something in the back of my mind, what would reboot the AP so regularly, but not impact anything else. Then I remembered the POE switch I use has a port watchdog, if it can’t ping the IP of the device attached it reboots the port. IP updated on the switch, wifi issues goes away and just in time to cancel the amazon order.

The upgrade was complete and I now have some bonus things I didn’t before, including, a stable connection, the ability to back the van up properly and a movie / TV sync to keep plex up to date. For the same price as the 2x Pi 4s I have a much more scalable and stable infrastructure ready for when a better internet connection comes along!

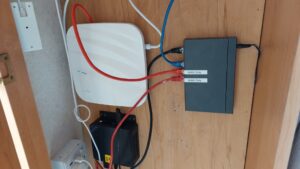
Photo showing gl inet router, switch and beelink mini PC in a cupboard

Anisble

I have setup an ansible run book to update all my linux boxes, this post is mostly just my notes! Add User to host to be managed
Create ansible user
visudo and add the following
# Allow ansible to execute
ansible ALL=(ALL) NOPASSWD:ALL

Copy key from anisble "server" to new host
ssh-copy-id -i /$HOME/.ssh/id_rsa.pub ansible@host

Check you can login without a password
ssh ansible@host
I have a simple runbook, that connects to the servers in a hosts file, updates and reboots servers if needed.
update.yml

- hosts: servers
  become: true
  become_user: root
  tasks:
    - name: Update apt repo and cache on all Debian/Ubuntu boxes
      apt: update_cache=yes force_apt_get=yes cache_valid_time=3600

    - name: Upgrade all packages on servers
      apt: upgrade=dist force_apt_get=yes

    - name: Check if a reboot is needed on all servers
      register: reboot_required_file
      stat: path=/var/run/reboot-required get_md5=no

    - name: Reboot the box if kernel updated
      reboot:
        msg: "Reboot initiated by Ansible for kernel updates"
        connect_timeout: 5
        reboot_timeout: 300
        pre_reboot_delay: 0
        post_reboot_delay: 30
        test_command: uptime
      when: reboot_required_file.stat.exists
That’s it, simply create a hosts file along side the runbook and away you go. I have a little script that sits with those to two files to run the playbook.
update.sh

su ansible -c "ansible-playbook -i /scripts/update-project/hosts /scripts/update-project/update.yml"
That’s all there is too it, it saves me hours of manual linux patching (also means I don’t forget my unloved servers)!

It’s a lab in a box

Something I’ve wanted for a while is a mobile lab. Something in a flight case. Mainly because it would be cool, but also it would be nice to have a fully mobile setup to demo or use for small migrations.

I don’t have a budget for a lab in a box that will just sit there so the components needed to be reusable. I recently came across Beelink mini PC’s (I bought one for Sophie for her new Cricut machine) and I’ve been thinking about upgrading the caravan infrastructure. So I thought I would combine the two and design and build a lab in a box.

The main components:

    • Beelink Mini PC U59 Pro (N5105, 16Gb RAM, 256Gb M2 and 2Tb SATA drive, Dual Gb Network)
    • GL-Inet Slate Plus (same chipset as the “cirrus” I use)
    • TP Link Gb PoE Switch
    • TP Access Point

The plan is to present a number of ports to the edge of the case. Extending beyond the walls of the case should allow more connectivity to the internal and external interfaces.

This month I will be building the “IT” bits of the build and hopefully next month buying the case and the ports. 

How is it reusable?

    • Slate Plus – Router – Can be used as a travel router with no changes.
    • Beelink U59 Pro – Server – Can be used as a Proxmox lab with no changes.
    • TP Link – PoE Switch / Access Point – Probably best left configured for lab.
    • Roku – Media Player – Can be used with any Wi-Fi (or combined with Slate Plus for travel).

How could it be extended?

With the external ports there are lots of options. You could add a NAS for migrations, plug in Broadband for a demo, tether it to your phone for a rural / mobile deployment (via WAN USB), join it to a conference / hotel wireless network for demos / watching films, download your plex library to the server for media on the go or even deploy it as an office in the box for DR / BCP, smarthome demo lab with Home Assistant, I’m sure there are more ideas to come!

Once it’s all setup I’ll publish a new post with pics. 

Flight Case

Update... It's a lab in a bag

I have finished the build and I am pleased with how it came out. Unfortunately for my budget lab I couldn’t spring for a case at the moment (v2 and I have the panel mounts!). Here it is completed! Just some cable management to sort out (possibly false bottom in the case).

Intel 5xxx and Proxmox

Just a quick one today. I started playing with Proxmox on a Beelink U59 Pro, there were some VM instabilities and it turns out I wasn’t alone.

Proxmox Forum: https://forum.proxmox.com/threads/pve-keeps-rebooting-beelink-u59.112074/

Uh oh! I thought I would be stuck turning this into a Win Mini PC, however, it turns out there are some CPU issues with the Intel 5xxx processors, here. 

I had a look through the forums and it looks like it is an issue with Kernel 5.15. Proxmox have issued a 5.19 kernel which appears to resolve the issue, this has since be superseded with a 6.1 Kernel.

Forum post here.

It’s easy to install though

apt update
apt install pve-kernel-6.1
reboot


Update – 27/02/2023

Turns out there is slightly more to the issue than a kernel patch.

You need to patch the microcode for the processor.

Add the following to /etc/default/grub (GRUB_CMDLINE_LINUX_DEFAULT)  intel_idle.max_cstate=1 processor.max_cstate=1

Update Grub (update-grub)

Update Intel-Microcode 
edit /etc/apt/sources.list add non-free to

deb http://ftp.debian.org/debian bullseye main contrib non-free
deb http://ftp.debian.org/debian bullseye-updates main contrib non-free
deb http://security.debian.org bullseye-security main contrib non-free

update by
apt update
apt install intel-microcode

Canary Light & Power Cuts

This post is going to be quite wordy! We’ve had a number of powercuts recently and like any smarthome my house takes time to reboot.

There have been a couple of issues when the power comes back, the first is some of my smartlights don’t support power restoration states, so they come on as soon as power comes back.

This got me thinking, then I came across the “canary light”. This is a device that always comes on when the power resumes (just a standard tuya bulb in my case).

When this light turns on home assistant then triggers an automation that turns off all the lights (after 2 mins, to make sure that everything is back up) that don’t support power restoration. It also emails me to tell me that power has been restored. I have tested it a couple of times and it works really well. Thankfully none of the devices that power on are in bedrooms or waiting for 2 minutes in the middle of the night would definitely be bad!

I also purchased a UPS (I know, I know, but I’ve been spoiled by good power for a long time) and hooked it up to my server, using NUT it will shutdown when the battery gets low and it will email me. 

I have an old TP-Link WR802N which can be used as an access point. I have connected this to a port on my server for power and used a spare NIC in my proxmox server and added it as a bridge. This gives me wifi in the event of power lose. It’s small and is running really well off the PC’s USB port. If you are going to do this you will need to make sure you get the v1 version as it’s power requirements are a lot lower than later versions. 

That’s wifi and lights / smarts covered off. 

The final part is my internet connection, this comes in the other side of the house to my study. Currently my vigor “modem”, sits next to the phone socket and then I use powerline to get it across the house. As you will have probably guessed, power line doesn’t work when there is no power. So I will be running a new cable round the house to deliver the phone line to the study and then I will move the vigor to the study!

Job nearly done! 

Postfix From Rewrite

Quick article about re-writing the from address from postfix. First install the libsasl2-modules.


Add the following to main.cf 


sender_canonical_classes = envelope_sender, header_sender
sender_canonical_maps =  regexp:/etc/postfix/sender_canonical_maps
smtp_header_checks = regexp:/etc/postfix/header_check
</pre class="code highlight" lang="shell"></span class="line" lang="shell">

Then create the files and their contents


/etc/postfix/sender_canonical_maps
/.+/ newemail@domain.com

/etc/postfix/header_check
From:.*/ REPLACE From: newemail@domain.com

Reload Postfix and test

mail -s “Test Subject” user@example.com < /dev/null

Check the mail logs to see if it’s successful. This trick is really useful if you use a 3rd party to relay email and they require some form of domain or address authentication.