Colourful Norwich skyline illustration

Michael Sage

IT, Digital & Culture

Migrations & Pi KVM

Over the last month I have migrated my home server from a Gen 8 HP Microserver to a Lenovo P500 workstation. There are many reasons for my migration the two biggest were that I was being constrained by the amount of RAM the Microserver could take (16Gb vs 512Gb), the processor was also becoming a bit of a bottle neck.

The second was that in my professional life I have moved from VMWare ESXi to Proxmox and my home lab was the only ESXi server that I was left managing, it also meant I wasn’t reflecting my professional install base so making it hard to test things.

Migrations are horrible, no matter how much planning you do, they take time and suck! No matter how many trials and tests you do there will always be something.

I used an old desktop PC with a 500Gb SATA drive and a 240Gb SSD to migrate all servers other than the Windows server (not enough space or grunt).

Although exceptionally boring and probably of no interest to anyone this was my migration plan..

  • Shutdown new host
  • NIC in new host
  • Check Second Network Card
  • Restore firewall
  • Copy all Proxmox machines from test proxmox host 
  • —–
  • Migration
  • Copy latest backup
  • Run Full backup c:\backups\backup.bat
  • Check USB disk on another PC
  • Close OneDrive
  • Restart PC
  • Check OneDrive is stopped
  • Shutdown VM
  • Convert System Disk
  • Check Proxmox Boot
  • —–
  • Move 2Tb disks to think station
  • Create new ZFS 2Tb for File Server
  • Boot File Server
  • Add 1.8Tb disk
  • Setup OneDrive if needed

20/02/2020 20:12 <JUNCTION> data [d:\data]
17/09/2020 08:48 <JUNCTION> media [D:\media]
17/09/2020 09:07 <JUNCTION> server backups [D:\backups]

  • Start OneDrive
  • Undisable Start with Windows OneDrive
  • Check shares
  • Remove “to watch” from backups
  • USB pass through
  • Setup Proxmox Backups (Exclude File Server d drive)
  • —–
  • Remove SSDs from Microserver and check
  • Rebuild Test Proxmox as Hobby PC with 240Gb SSD
  • —–
  • Take old Hobby PC
  • Check 120Gb SSDs
  • —–
  • 2FA for SSH and Proxmox on New Host
  • Add New Host to Nagios

This was all in a text file which I constantly updated and changed during the actual migration. It went well and there were only a couple of hiccups. The testing had paid off.


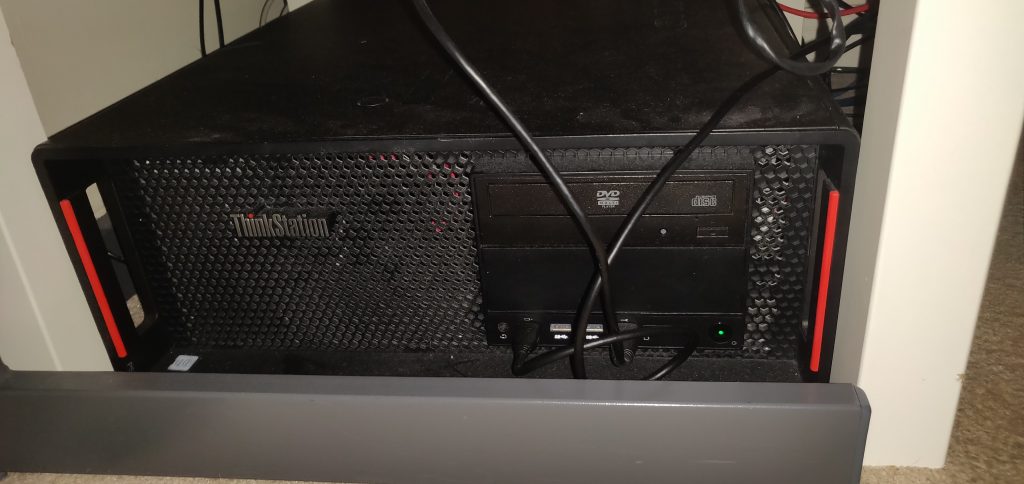
Photo of ThinkStation Home Lab

Hopper – New Host

Running proxmox with a number of Windows, Linux and BSD VMs.

  • Intel(R) Xeon(R) CPU E5-2609 v3 @ 1.90GHz (1 Socket)
  • 48Gb RAM
  • 2x 480Gb NAS SSD (ZFS), 2x 3Tb NAS SATA (ZFS), 1x 2Tb SATA (Backups)

The two USB cables – One going to an external HDD for file level backups, the second goes to the Pi KVM (for keyboard and mouse control)

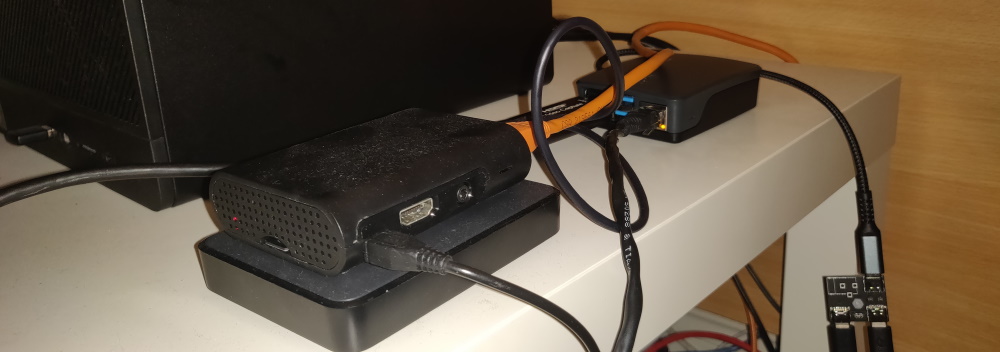
Photo of two Raspberry Pi's one with an external hard drive and one with power hanging over the edge (whoops)

The Pis

Tron – Pi 3+
4Tb USB Drive
Backup Pi (Rsync and rclone)

IP KVM – Pi 4 (2Gb)
Power/Data Splitter at the back
USB to HDMI Capture Card

Both are cabled into the network. The Pi 2 only has 100Mbps network, so it’s likely to need replacing soon to keep up with my internet, but for now it works! The Pi 3+ has “Gb network” however due to it using the same USB bus it can only realistically achieve 300Mbps.

Pi KVM

This part of the project nearly got it’s own page… However, I don’t have much to say! One of the biggest drawbacks of migrating to the workstation was that I lost iLO (intelligent lights out / IPMI). I use iLO rarely but it is an incredibly useful when you do need it!

I was looking at aftermarket cards and IP based KVMs and they are expensive! I couldn’t justify the cost for a single host or the amount of time I use it. 

Then I came across Pi KVM, it looked hugely daunting until I started reading about it. For simple KVM features (and a host of other features) it was incredibly easy to build a Pi 4 KVM (you can use other Pi generations but you will need to do more work). Just one cable and an HDMI capture card and it just works! 

They are also developing their own Pi HAT with all the features (including power management (i.e. remote reboot)), I’ll probably buy one when they are released as I can think of a number of locations where a sub £100 KVM would be a life saver, especially with the remote reboot abilities.

Pi KVM can be found here: https://www.pikvm.org/

Another Pi KVM project can be found here: https://tinypilotkvm.com/

Bits I bought to make my Pi KVM

That was it! I had a case, power supply and SD card knocking about any way… When the hat is released I will need to think about a different case.

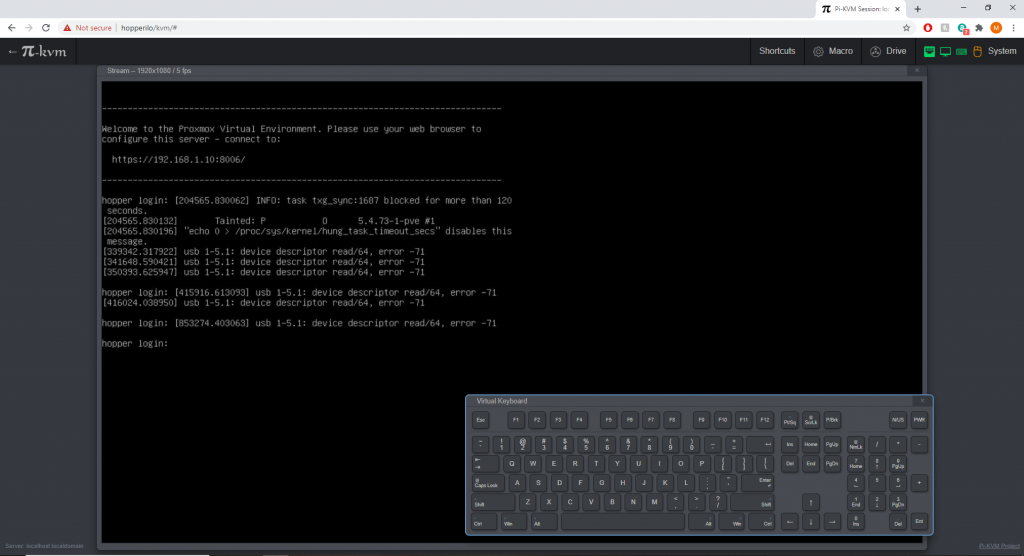
Screenshot of Pi KVM in a web browser
Pi KVM (Currently only using KVM, power control to come later)

Cloudkey 2+ Let’s Encrypt & Backups

Let's Encrypt using DNS on Cloudkey 2+ & Backups

Update: 16/02/2021 – For CK2+ off controller backups see this great how-to: https://lazyadmin.nl/home-network/backup-unifi-controller-to-cloud/

Update: 22/12/2020 – Use this script instead: https://glennr.nl/s/unifi-lets-encrypt

Stolen from the UI community site, but copied here in case Unifi change their forums again or it gets lost to the mists of time (Original URL: https://community.ui.com/questions/How-To-Lets-Encrypt-with-Cloud-Key-and-DNS-Challenge/)

Uses the domain my-domain.xyz, one shortcoming is that my current external DNS provider doesn’t have an API, so I have to manually complete the challenge every 3 months, but the whole process takes just a few minutes so I’m not too concerned.

All steps are performed directly on the Cloud Key.

First, install Git and obtain the Let’s Encrypt code:

cd /home

sudo apt-get update

sudo apt-get install git

git clone https://github.com/letsencrypt/letsencrypt

Next, generate a certificate, specifying that you want to use a DNS challenge for proving ownership of the domain.

certbot certonly --manual --preferred-challenges dns --email notification-email@my-domain.xyz --domains unifi.my-domain.xyz

In this example, unifi.my-domain.xyz is an internal hostname that resolves to my cloud key, and notification-email@my-domain.xyz is an email address where I’d like Let’s Encrypt to send me a reminder when the certificate is about to expire.

Since we are using a DNS challenge, you will be prompted to create a TXT record with your DNS provider.  Let’s Encrypt will confirm that the DNS record is visible from their cloud infrastructure, thus proving you own the domain, and it will grant your certificate.

Next, stop unifi, since we’re about to mess with its certificates:

service unifi stop

Next, make a backup of the existing certificate data and remove it:

mkdir cert_backup

cp -r /etc/ssl/private/ cert_backup

rm /etc/ssl/private/cert.tarrm /etc/ssl/private/ssl-cert-snakeoil.key

Next, export your newly-granted Let’s Encrypt certificate into a format that Unifi understands:

cd /etc/letsencrypt/live/unifi.my-domain.xyz/

openssl pkcs12 -export -in fullchain.pem -inkey privkey.pem -out cert.p12 -name unifi -password pass:your_certificate_password

Here, your_certificate_password is a temporary password of your choosing to protect the exported certificate.

Next, import the Let’s Encrypt certificate into the Unifi keystore:

keytool -importkeystore -deststorepass aircontrolenterprise -destkeypass aircontrolenterprise -destkeystore /usr/lib/unifi/data/keystore -srckeystore cert.p12 -srcstoretype PKCS12 -srcstorepass your_certificate_password -alias unifi

Note that aircontrolenterprise is the Unifi keystore password; it is not a password of your choosing.

In this command, /usr/lib/unifi/data/keystore is actually a symlink pointing to the /etc/ssl/private directory from earlier.

At this point, the Unifi Controller will work with your Let’s Encrypt certificate, but recall that the Cloud Key has a separate internal nginx-based webserver to handle OS configuration options.

Next, replace the default certificates in the location nginx is expecting them, and make sure the permissions are correct:

cp fullchain.pem /etc/ssl/private/cloudkey.crt

cp privkey.pem /etc/ssl/private/cloudkey.key

chown root:ssl-cert /etc/ssl/private/*

chmod 640 /etc/ssl/private/*

tar -cvf cert.tar *

chown root:ssl-cert cert.tar

chmod 640 cert.tar

Finally, restart nginx, protect and start the Unifi controller.

service nginx restart

service unifi-protect restart

service unifi start

At this point, they should come up and be using your Let’s Encrypt certificate.

Set a calendar reminder for ~2 months from now so you don’t forget to redo this before the certificate expires!

This guide simply re-arranges the hard work that others have done into a solution that fits my specific needs.  The author (pcoldren) used bits and pieces from the following resources while writing it:

https://community.spiceworks.com/how_to/128281-use-lets-encrypt-ssl-certs-with-unifi-cloud-key

https://tom-henderson.github.io/2015/06/05/unifi-ssl.html

https://serverfault.com/questions/750902/how-to-use-lets-encrypt-dns-challenge-validation

https://www.c0ffee.net/blog/unifi-cloud-key-ssl-certificate

https://www.naschenweng.info/2017/01/06/securing-ubiquiti-unifi-cloud-key-encrypt-automatic-dns-01-challenge/


Lego Rack Server

Rack Mount Lego Server

Stolen from a LinkedIn post.

Parts List:

Element ID (BrickLink) Description Quantity
11211 Brick – Modified 1×2 with Studs on 1 Side 2
2412a Tile – Modified 1×2 Grille without bottom lip 9
2431 Tile – 1×4 4
26603 Tile – 2×3 1
3003 Brick – 2×2 1
3004 Brick – 1×2 1
3010 Brick – 1×4 8
3020 Plate – 2×4 2
3023 Plate – 1×2 4
3024 Plate – 1×1 6
3068a Tile – 2 x 2 without Groove 3
3069a Tile – 1 x 2 without Groove 6
3622 Brick – 1×3 2
63864 Tile – 1 x 3 2
69729 Tile – 2×6 (not many colour choices for this one) 1
87079 Tile – 2 x4 1
92438 Plate – 8×16 1
Total 54

Alternative for the front (avoiding 69729 – Tile – 2×6) for more colour options!

Element ID Description Quantity
3005 Brick – 1×1 2
3068a Tile – 2×2 1
26603 Tile – 2×3 1
87079 Tile – 2×4 1
87087 Brick – Modified 1×1 with stud on 1 side 4

Using the above list you don’t require – 69729, 11211, 3004 or 26603 – from the first list!

Shelly HTTP Commands

Some standard HTTP commands for the Shelly I have found In case of password protected you will need to put http://user:password@shellyIP first

Shelly 1:
Turn on:
http://192.168.xxx.xxx/relay/0?turn=on
Turn off:
http://192.168.xxx.xxx/relay/0?turn=off
Turn on and after ttt-seconds automatically turn off: (ttt replace with the desired time in seconds!)
http://192.168.xxx.xxx/relay/0?turn=on&timer=ttt
The code can also be sent to an already activated Shelly. This will stay on for ttt seconds and then turn off automatically. Turn off and after ttt-seconds automatically turn on: (ttt replace with the desired time in seconds!)
http://192.168.xxx.xxx/relay/0?turn=off&timer=ttt
The code can also be sent to an already switched off Shelly. This will remain switched off for ttt seconds and then automatically switched on.

Switch toggle:
http://192.168.xxx.xxx/relay/0?turn=toggle

Proxmox Community Updates

First remove the enterprise enterprise.proxmox repository

# rm /etc/apt/sources.list.d/pve.enterprise

#apt update && apt -y full-upgrade

Add the no-subscription or pve-test repositori :

#nano /etc/apt/sources.list
deb http://download.proxmox.com/debian buster pve-no-subscription

Go back to the GUI and check you can get updates!

Flic HTTP request with Authentication

When you are wanting to use the HTTP request within Flic it doesn’t work using the standard user:pass@host. So you have to do a little more work…

  • Add your URL which for me was http://xxx.xxx.xxx.xxx/relay/0?turn=toggle to turn a light on or off in the garage.

  • stick with GET http method (or which ever suites)

  • under the HTTP headers, set up basic authentication i.e. type “Authorization” in the Key field of the app

  • encode your “user:password” string using base64 (I used base64encode.org for online base64 encoding)

  • Prefix the encoded string with “Basic ” including a trailing space

  • “Basic YWRtaW46YWRtaW4NCg==” is encoded “admin:admin” as an example. Key or paste all of this into the Value field in the FLIC app

  • Press the save button.

  • Press DONE to ensure all saved away

OPNsense + NextCloud Backup – Windows Client Issue

OPNsense backups contain a special character, in this case “:”. Which while most operating systems tolerate it causes an issue with the Windows NextCloud client and it is unable to sync. The developer has a very good point in that this isn’t a OPNsense issue, but a NextCloud / Windows one for not respecting, or being able to deal with special characters. However, all is not lost, there is a tiny modification you can make to one file on the OPNsense server to make everything OK!

First log into the shell on the OPNsense box (option 8 on the console GUI)

If you don’t have an editor installed you can use vi, or you can install nano

pkg install nano

Open the file

nano /usr/local/opnsense/mvc/app/library/OPNsense/Backup/Nextcloud.php 
Change line 132 from
$configname = 'config-' . $hostname . '-' .  date("Y-m-d_h:m:s") . '.xml';
to
$configname = 'config-' . $hostname . '-' .  date("Y-m-d_H-i-s") . '.xml';
This changes the “:” to a “-“, but you could change this to anything you like. Save the file, job done!

Remember it is likely this will get overwritten with updates to OPNsense so I recommend you check the file after every update!

Duo ByPass

To bypass duo 2fa for a script or secure login etc on Linux you simply need to add the following to your SSHD PAM config (/etc/pam.d/sshd)

auth    [success=2 default=ignore]      pam_access.so accessfile=/etc/security/access-local.conf

You will then need to create the access file and put your rules in for example

+ : ALL : 192.168.1.0/24
- : ALL : ALL

For information on the access file, see here

Image Hosting URL Options

https://github.com/HaschekSolutions/pictshare/blob/master/rtfm/MODIFIERS.md

Images

Resize

/800x600/d8c01b45a6.png

width x height

Rotate

/upside|left|right/d8c01b45a6.png
  • upside: 180°
  • left: 90°
  • right: -90°

WebP conversion

/webp/d8c01b45a6.jpeg

Gif to mp4

/mp4/d8c01b45a6.gif

Filters

/filter/d8c01b45a6.png

See available filters


Nagios Core Upgrade

Ubuntu

Stop Service / Daemon

This command stops Nagios Core.

===== Ubuntu 14.x =====

sudo service nagios stop


===== Ubuntu 15.x / 16.x / 17.x / 18.x =====

sudo systemctl stop nagios.service


Downloading the Source

cd /tmp
sudo rm -rf nagioscore*
wget -O nagioscore.tar.gz https://github.com/NagiosEnterprises/nagioscore/archive/nagios-4.4.1.tar.gz
tar xzf nagioscore.tar.gz


Compile

cd /tmp/nagioscore-nagios-4.4.1/
sudo ./configure --with-httpd-conf=/etc/apache2/sites-enabled
sudo make all


Install Binaries

This step installs the binary files, CGIs, and HTML files.

sudo make install


Install Service / Daemon

This installs the service or daemon files. While these will already exist they do get updated occasionally and hence need replacing.

sudo make install-daemoninit


Update nagios.cfg

If you are upgrading from Nagios Core 4.3.2 and earlier you will need to update the nagios.cfg file to point to /var/run/nagios.lock using the following command:

sudo sh -c "sed -i 's/^lock_file=.*/lock_file=\/var\/run\/nagios.lock/g' /usr/local/nagios/etc/nagios.cfg"

More information about this is detailed in the following KB article:

Nagios Core – nagios.lock Changes In 4.3.3 Onwards


Start Service / Daemon

This command starts Nagios Core.

===== Ubuntu 14.x =====

sudo service nagios start


===== Ubuntu 15.x / 16.x / 17.x / 18.x =====

sudo systemctl start nagios.service


Confirm Nagios Is Running

You can confirm that the nagios service is now running with the following command:

===== Ubuntu 14.x =====

sudo service nagios status


===== Ubuntu 15.x / 16.x / 17.x / 18.x =====

sudo systemctl status nagios.service


Confirm Nagios Version

You can confirm the nagios version being used with the following command:

sudo /usr/local/nagios/bin/nagios -V


This will output something like:

Nagios Core 4.4.1